How to fix a stripped screw hole (wood, drywall, metal)
Updated October 26, 2026
A screw that turns and turns without tightening has usually stripped the hole, not itself. The fix depends on what the hole is in: wood can be filled and drilled again, drywall needs an anchor because gypsum holds a screw thread poorly, and metal needs a new thread cut, either a bigger one or an insert that brings back the original size.
| The hole is in | What has failed | Where to go |
|---|---|---|
| Wood | Fibers crushed, screw spins but will not tighten | Wood |
| MDF, particleboard, plywood edge | Core blown out around the screw, or the edge of a sheet is split | MDF and particleboard |
| Drywall | Anchor spun out, screw ripped through gypsum, hole now too big for the anchor | Drywall |
| Metal, tapped hole | Thread stripped out, or deformed from a cross-thread or over-torque | Metal |
| Plastic or 3D print | Heat-set insert pulled, or a self-tapping screw tore the plastic thread | Plastic |
| Thin sheet metal | Screw spins; sheet too thin to hold a cut thread | Thin sheet metal |
| Any material | Screw head is chewed and the screw itself will not come out | How to remove a stripped screw |
First, work out what has failed
Take the screw out and look at the screw itself and at the hole. Six quick patterns:
| What you see | What it usually is | Where to go |
|---|---|---|
| Screw turns and turns, never tightens | Hole is stripped | By material, below |
| Screw sits proud, resists at the end | Bottomed out: wrong length, chip in the hole, or cross-threaded | Remove the screw and look in the hole; back a cross-thread out carefully |
| Screw's own thread looks flattened or torn | The screw stripped, not the hole | Try a fresh screw of the same size first |
| Screw grips the first few turns, then free-spins | Only the first thread or two have failed, deeper thread is fine | A shorter screw, or an insert so the full depth bites again |
| New hole already strips on install | Tap drill too big, or wrong tap/die for the thread | How to tap a hole and tap drill chart |
| Head is chewed and screw will not back out | Head damage, not the hole | How to remove a stripped screw |
If the screw's own threads look fine and it still spins, the hole is worn and the sections below apply. If the head is chewed and the screw will not come out at all, start with how to remove a stripped screw.
Wood
Wood screws cut their own thread in the wood fibers as they go in. When those fibers crush or tear, the hole becomes bigger than the screw's thread and nothing holds. Every repair here puts solid wood back for the thread to bite, with its grain running the length of the hole so the thread cuts across the fibers rather than along them — that is the direction wood holds a fastener best (USDA Wood Handbook, ch. 9: screw-withdrawal resistance is set mostly by density and by whether the screw bites side grain or end grain).
Small screws: toothpicks or matchsticks and glue
The common quick fix for small screws (cabinet hinges, door hardware, a guitar strap button): coat a few wooden toothpicks or matchsticks with wood glue, push them into the hole until it is packed, snap or cut them flush at the surface, and let the glue cure as the label says. Then drill a small pilot hole and drive the screw into the new wood. Toothpicks and matchsticks are long-grain birch or similar — short pieces of the same kind of material a dowel is made of — which is why they hold once the glue sets. A yellow aliphatic PVA (Titebond Original or II) is the usual choice; polyurethane and epoxy work too but have longer cure times.
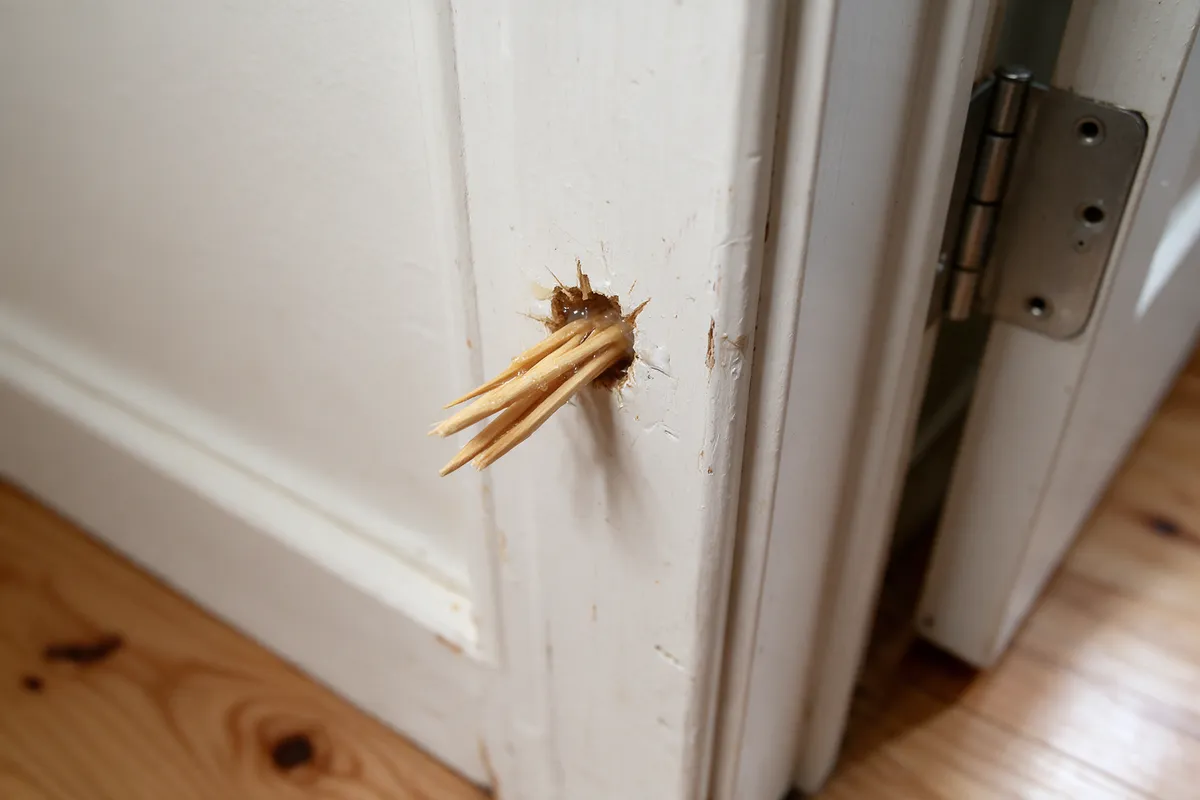
Bigger holes and load-bearing screws: a hardwood dowel plug
For a bigger hole, a hole that has been patched before, or anything that carries weight (hinges on a door, drawer slides, chair rails), drill the stripped hole out clean to a known dowel size, glue in a short piece of hardwood dowel, cut it flush and drill a new pilot in the centre. A dowel gives the screw a continuous piece of long-grain wood across its whole length, which is why it is the usual shop answer for hinges on a door jamb. Match the dowel species to the hardness of the surrounding wood where you can: a birch dowel in a softwood jamb is fine, but a soft dowel in oak will crush before the oak does.
1. Strippedfibers crushed, hole too big
2. Glue in woodtoothpicks or a dowel, packed with glue
3. Cut flushlet the glue cure, trim at the surface
4. Pilot and screwthread bites new long-grain wood
Wood filler and epoxy fillers
Ordinary wood filler and putty are made to fill holes and dents for appearance, and most are not meant to hold a screw thread under load — the label will usually say so. Products sold as "wood repair epoxy" or structural wood filler (a two-part paste that cures hard) are a different story: they are routinely used on rotten window sills and door frames and will take a pilot hole and a screw once cured. Check the label for the specific claim and the cure time. For anything that carries weight on a cabinet or a door, a glued wood plug is still the more common shop answer.
A bigger or longer screw, or a shift of the hardware
A screw one gauge thicker cuts fresh wood around the old hole, and a longer one reaches wood the first screw never touched. Two checks: the head must still fit the hardware (hinge holes are countersunk for one specific size) and a longer screw must not come through the other face. On a door hinge that sags, a long screw in the hinge leaf next to the jamb can reach the wall framing behind it and pull the hinge tight.
Where the part allows it, you can also shift the hardware slightly and drill new pilot holes in sound wood. Both of these are often the simplest fix on a cabinet door before anything else.
MDF, particleboard and plywood edges
MDF (medium-density fibreboard) and particleboard look like wood but behave differently: both are small wood particles bonded with resin, with almost no long grain to speak of. A plywood face is strong, but its edge is a stack of thin plies glued end-on and holds a screw poorly for the same reason an MDF edge does.
- Toothpicks or small matchsticks can still work if the hole has only slightly opened up and the surrounding core is intact — a flat-pack cam-lock screw, a small cabinet hinge in good MDF.
- A hardwood dowel works less well than in solid wood: it needs the void around it to be filled too, because the loose MDF or particleboard dust around the dowel will crumble when the screw loads the dowel sideways. Use a structural two-part wood epoxy (products like PC-Woody, Abatron WoodEpox or Rotfix are the common ones) to pack the void first, press the dowel in, cut flush, then drill a new pilot once cured.
- If there is substrate behind (a plywood back, the frame of a cabinet, the sub-floor behind a toe-kick), a longer screw that reaches it is a cleaner fix than fighting the MDF.
- Insert nuts for furniture (threaded brass or zinc inserts for machine screws) replace the stripped wood thread entirely with a metal one and let the piece come apart later without breaking the board again.
Drywall
Gypsum is soft and crumbly, so a screw in drywall with no stud behind it holds little even before anything fails. If you are here, something already has: either an anchor spun out, or a screw ripped straight through the board. The fix is to spread the load over more board or to anchor into something stiffer, and the hole you have now is bigger than the one you drilled originally, so some options are closed.
If a plastic expansion anchor has spun out
Pull the empty anchor out, or push it through into the wall cavity, and look at the hole:
- Hole still small enough: fit the next size up of the same type, or move to a self-drilling threaded anchor — its coarse outer thread cuts into the gypsum around the enlarged hole and often grips where a plastic one no longer does.
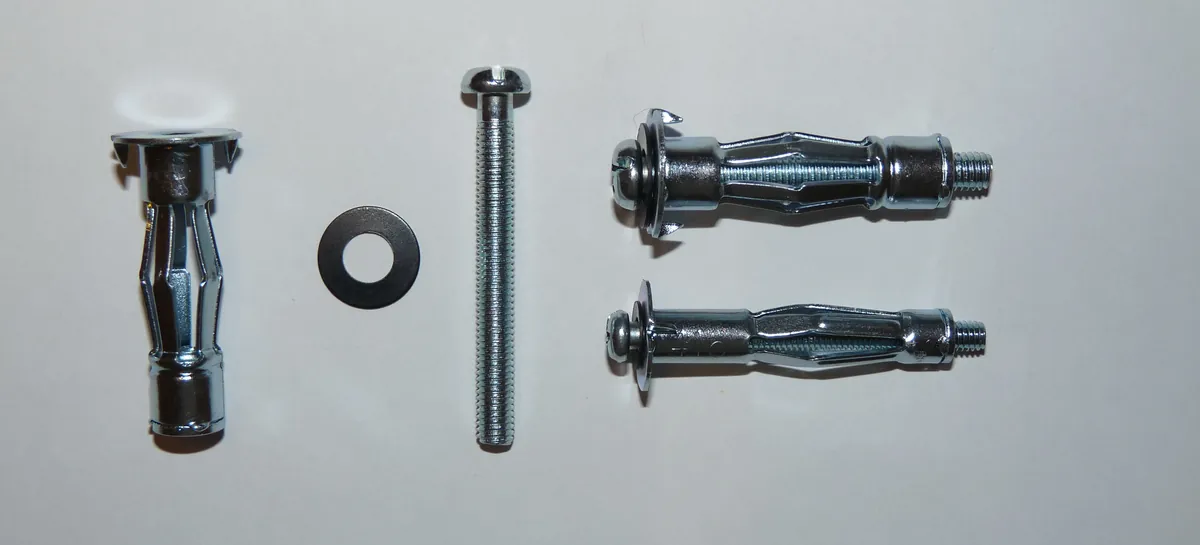
- Hole has opened up: step up to a hollow-wall sleeve anchor (molly) or a toggle bolt. Both open behind the board and press on its back face, so the hole you have is only the pass-through, not the load path.
- Hole is far too big for any anchor: patch it with a drywall repair plug or kit (a stiff clip that holds a drywall patch), let the compound cure, and set a fresh anchor in the patched board.
If a screw ripped through the gypsum
A screw straight into drywall never held a thread in it: the gypsum crumbs as it goes in, and most of the grip is actually the paper facing. The fix is always an anchor (one of the four below) or, better, a screw into the stud behind the board. A stud finder, or a careful probe with a thin bit, will tell you if there is framing within a few inches.
Pick the right anchor for what is left of the hole
- Ribbed plastic expansion anchors go into a drilled hole and spread as the screw goes in. Fine for light things; they are also the ones that spin and pull out, so they are rarely the right fix after one has already failed.
- Self-drilling (threaded) anchors have a coarse outer thread that screws straight into the drywall, in plastic or metal. Good for a hole that opened up a little, since the thread cuts a fresh seat.
- Hollow-wall sleeve anchors (often called molly bolts) have a metal sleeve that folds up behind the board when the screw is tightened. For medium loads and holes that have already enlarged.
- Toggle bolts and strap toggles pass through the hole and open into a bar behind the wall, spreading the load over more board. The biggest capacity of the four, and the most forgiving of a sloppy hole.

Plastic expansionspreads in the hole
Self-drillingthreads into the board
Hollow-wall (molly)folds up behind the board
Toggle boltbar opens behind the board
The package tells you what each anchor is rated for and the drill size it needs. For heavy loads — a shelf with books, a wall-mount TV, a grab bar — a screw into the stud is better than any anchor in the board alone. If there is no stud where you need one, a horizontal piece of wood screwed across two studs ("ledger") lets you place anything you want anywhere along it.
Metal
In metal you are not filling the hole, you are cutting thread. Soft metals such as aluminum and brass strip far more easily than steel, especially where screws go in and out often. Choose the response to match how much thread is left and whether the design can take a bigger screw.
Strippedthread worn flat
Next size upbigger hole, bigger screw
Thread insertbigger hole, original screw
Mostly intact: a thread chaser (not a cutting tap)
If the thread is only dirty, nicked or full of paint and the screw still grips in places, use a thread chaser (also called a thread restorer). A chaser looks like a tap but is ground to the thread profile with blunter edges and no cutting flutes to speak of — it pushes metal back into shape rather than cutting new material away. Chasers come in internal (tap form) and external (die form) and are sold by thread size and pitch, often as a set. Lang Tools, Hanson and Craftsman all sell inch and metric sets.
Reach for a cutting tap only when there is metal that has to come off: a thread full of hard debris that a chaser cannot push through, or burrs you need to trim. A tap of the same size and pitch, started carefully so it follows the old thread, will clean up most threads — but you give up a little material each time, so a chaser is kinder on a thread that is only slightly damaged. See how to tap a hole for technique and thread identification if you are not sure what the thread is.
Thread gone: go one size up (if the design lets you)
If the thread is stripped out, one option is to drill the hole to the tap drill of the next common size and tap it. For example, a stripped 1/4-20 hole uses the #7 drill; going up to 5/16-18 means drilling with F and tapping 5/16-18. You then need a bigger screw, and the part it clamps needs a bigger clearance hole too. The table shows both from our thread data; every size is also in the tap drill chart and the metric tap drill chart.
This path only works if three things line up: there is enough metal around the hole for a larger tap, the mating part can take a bigger clearance hole without colliding with other features, and the design does not require a specific thread size (a cover plate held by machine standards, a part that must take a given cap screw). On a hole that must stay the original size — or where the next size up would weaken the surrounding metal — use an insert instead.
| Stripped | Possible next size | Tap drill | Clearance hole in the other part |
|---|---|---|---|
| #4-40 | #6-32 | #36 0.1065 in | #18 0.170 in |
| #6-32 | #8-32 | #29 0.1360 in | #9 0.196 in |
| #8-32 | #10-24 | #25 0.1495 in | #2 0.221 in |
| #10-24 | #12-24 | #16 0.1770 in | – |
| #10-32 | 1/4-28 | #3 0.2130 in | 9/32" 0.281 in |
| 1/4-20 | 5/16-18 | F 0.2570 in | 11/32" 0.344 in |
| 5/16-18 | 3/8-16 | 5/16" 0.3125 in | 13/32" 0.406 in |
| 3/8-16 | 7/16-14 | U 0.3680 in | 15/32" 0.469 in |
| M3 x 0.5 | M4 x 0.7 | 3.3 mm 0.1299 in | 4.5 mm |
| M4 x 0.7 | M5 x 0.8 | 4.2 mm 0.1654 in | 5.5 mm |
| M5 x 0.8 | M6 x 1 | 5 mm 0.1969 in | 6.6 mm |
| M6 x 1 | M8 x 1.25 | 6.8 mm 0.2677 in | 9 mm |
| M8 x 1.25 | M10 x 1.5 | 8.5 mm 0.3347 in | 11 mm |
| M10 x 1.5 | M12 x 1.75 | 10.2 mm 0.4016 in | 13.5 mm |
Where the stripped hole is in soft metal and the fix needs to last, consider jumping to an insert even if a bigger thread fits: the insert's harder steel resists further stripping better than fresh aluminum or brass of a bigger diameter.
Thread inserts: same screw, new thread
An insert is a sleeve of fresh thread that goes into an enlarged hole and gives you back the original size inside it — the mating screw does not change, so the design stays the same.
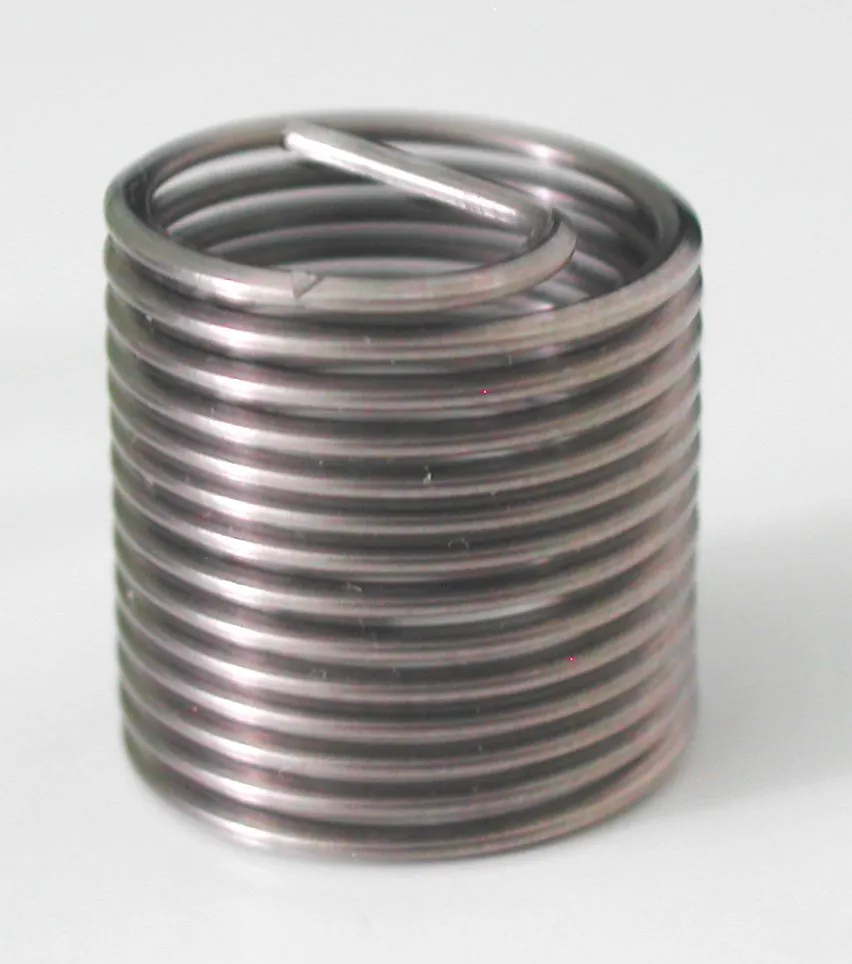
- Helical coil inserts (HELICOIL and generics) are a coil of diamond-section wire. The hole is drilled larger and cut with a special tap — typically a Screw Thread Insert (STI) tap of the same nominal size, which is ground oversize to match the coil. An STI tap for 1/4-20, for example, cuts a bigger hole than a plain 1/4-20 tap; the coil goes in, and the finished thread inside the coil is standard 1/4-20 again. The coil is wound in with an installation tool, and on most types the driving tang is then broken off below the surface.
- Solid inserts are threaded bushings, threaded inside and out. TIME-SERT, Recoil Insert Pro and E-Z LOK each design their own; some lock with keys or pins driven in after installation, others with a self-tapping outer thread. Their wall is thicker than a coil's, so the hole is bigger still.

The drill and tap are not the ones in a standard tap drill chart: STI taps follow their own sizes, and solid-insert makers each publish their own drill and tap for every insert they sell. The LittleMachineShop STI listing, the TIME-SERT catalog and the E-Z LOK installation data are the authoritative sources for the sizes they cover. Use the drill and tap printed in the kit, not the ones for the nominal screw size.
Plastic parts and 3D prints
Thermoplastic parts and 3D prints — the kind that soften when heated, like PLA, PETG, ABS, nylon and most engineering plastics — use a heat-set insert: a knurled brass or steel sleeve pushed into a straight hole with a soldering iron, which melts a thin layer of plastic around the sleeve and locks it in place as the plastic cools. The hole is drilled or printed straight, not tapped, and sized per the insert maker (CNC Kitchen, ruthex, McMaster-Carr list the hole for every insert in their catalog).
Thermoset plastics (filled epoxy castings, phenolics, some structural resins) do not soften with heat, so a heat-set insert does not work in them. They take an expansion insert (press-fit or hammer-set), a self-tapping insert that cuts its own thread as it goes in, or an adhesive-bonded insert glued in with structural epoxy.
If a heat-set insert has pulled out of a soft thermoplastic, enlarging the hole slightly and heating the next-size insert back into the same spot is usually the shortest fix — the melted plastic flows into the knurls again as the insert cools.
Thin sheet metal
Sheet metal is often too thin to hold more than a thread or two, so it strips easily. A larger sheet metal screw, a nut on the back side, a clip-on nut or a rivet nut (a threaded rivet installed from one side) usually works better than trying to tap it.